Getting Started
Find your way quickly
20.06.2019: Updated to cover changes in version 2.2
The following sections hope to get you up to speed with Stagehand Live 2 quickly. I will focus on the main areas and not go into too much detail. In case there is questions on more specific features, I recommend to have a look at the feature pages which cover each topic more broadly.
Welcome
After completing the installation of the application, you can launch Stagehand Live 2 right away.

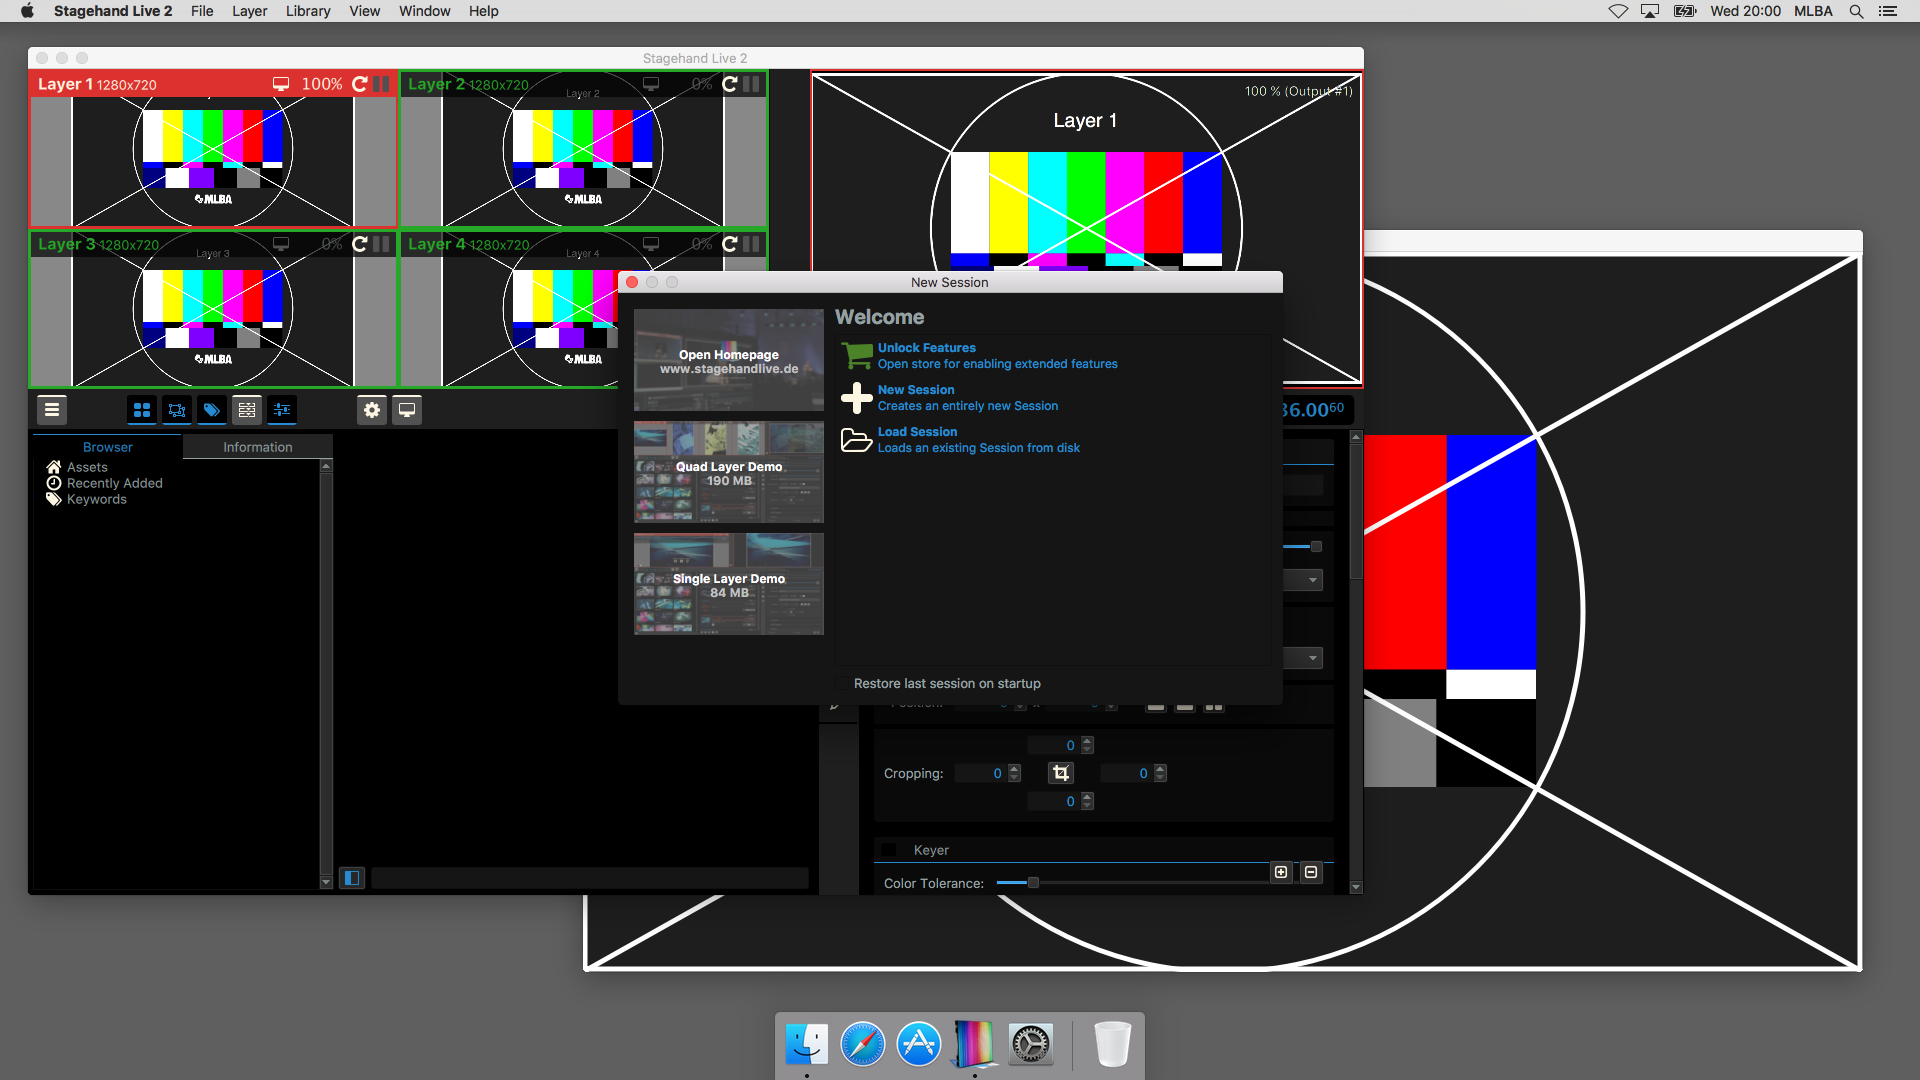
This screenshot shows Stagehand Live 2 right after the first start. From the welcome screen you can quickly recall one of the last sessions, start a completely fresh one or enter the store to unlock further features.
SESSIONS
A session encloses all current settings of Stagehand Live, i.e. selected sources, effects, sequencers and attributes. This also means internal settings on inputs such as NDI or ArtNet. You can save your current session anytime and recall it later.
The only exception is assets from the library. These are stored in the system and as such are shared across all sessions.
In addition you see two more windows. First the main window. This is where you have full control over Stagehand Live. I recommend to arrange your workspace as such that you can always see this window. There is also a secondary window onto which the program output is rendered.
The main window is divided into several areas, each of which can be shown or hidden independently from each other by using the toolbar.
- Multiview A preview of all layers. More details on the feature page.
- Preview The current program output. This is the same content that will also be shown on the projector.
- Toolbar with message area Quick control of area visibility and more.
- Asset Library Your collection of loops and contents. More details on the feature page.
- Effects and Settings. The settings and effects of the selected layer. This is where you can adjust the looks and position or size of the selected layer in the program output. More details on the feature page.
SELECTED LAYER
There is always one selected layer. You can easily find it in the multiview by searching the layer with the colored titlebar. Areas like effects always apply to the selected layer.
In order to change the selected layer, use a double click onto one of the layer titles in the multiview. Alternatively you may also use the shortcut ⌘ + 2 to select the second layer. Replace the number with any other number to select the respective layer.
Program Output
There is one program output. It is rendered to the window with the title ‘Output’. Use this window to get the program output onto a connected projector. Chose the entry for your projector from the menu at ‘Window’ > ‘Output on device’. From now on you have full control over the projector image through Stagehand Live. In case you want to move the output back into a window, chose ‘Window’ > ‘Output as window’.
The projector has to be configured as ‘Extended Desktop’ to be able to show content that is different from your main display. In case you need assistance with connecting the projector to your Mac, please refer to the documentation offered by Apple. On Linux we recommend using one of the UI tools for configuring the xrandr extensions, for instance ´lxrandr´ or ´arandr´.
You lost the window ‘Output’
In case you can’t find the window any more, it is most likely hidden behind the main window. Just use the toolbar button with the display icon to get it back to the foreground.
Selecting a source
There is two ways for you to change the source of a layer:
- For the selected layer you can use the buttons left of the area for effects and settings. More detail on the feature page.
- You can always change the source of any page through drag and drop. Just drag a file in a supported format onto a layer in the multiview. This works equally well for assets from the library.
In order to pause or rewind the source of a layer, use the buttons, which show when you hover over the multiview with your mouse.
Always remember that the content of a layer won’t show up automatically. You always need to make the layer visible first. Use the opacity slider in the settings area of your layer.
Questions?
I hope I was able to give a brief overview for getting started with Stagehand Live 2. In case there is more questions, feel free to contact us using the contact form. You may also write us at Twitter, #shlive2.
Apple, the Apple logo, Mac and macOS are trademarks of Apple Inc., registered in the U.S. and other countries and regions. App Store is a service mark of Apple Inc. We are making use of several libraries that are maintained by the Open Source community. A full list of these libraries can be found on our attributions page.
 Stagehand Live 2
